Nginx(二)-- 配置文件之虚拟主机配置

1.配置文件与解释

1
2
3
4
5
6
7
8
9
10
11
12
13
14
15
16
17
18
19
20
21
22
23
24
25
26
27
28
29
30
31
32
33
34
35
36
37
38
39
40
41
42
43
44
45
46
47
48
49
50
51
52
53
54
55
56
57
58
59
60
61
62
63
64
65
66
67
68
69
70
71
72
73
74
75
76
77
78
79
80
81
82
83
84
85
86
87
88
89
90
91
92
93
94
95
96
97
98
99
100
101
102
103
104
105
106
107
108
109
110
111
112
113
114
115
116
#user  nobody;
worker_processes 1; # 设置工作子进程,默认是1个工作子进程,可以修改,一般设置为CPU的总核数


#error_log logs/error.log;
#error_log logs/error.log notice;
#error_log logs/error.log info;

#pid logs/nginx.pid;


events {
worker_connections 1024; # 设置一个工作子进程最大允许多少个连接
}


http {
include mime.types; # 能够支持的类型
default_type application/octet-stream;

#log_format main '$remote_addr - $remote_user [$time_local] "$request" '
# '$status $body_bytes_sent "$http_referer" '
# '"$http_user_agent" "$http_x_forwarded_for"';

#access_log logs/access.log main;

sendfile on;
#tcp_nopush on;

#keepalive_timeout 0;
keepalive_timeout 65;

#gzip on;

server { # 虚拟主机段
listen 80;
server_name localhost;

#charset koi8-r;

#access_log logs/host.access.log main;

location / {
root html;
index index.html index.htm;
}

#error_page 404 /404.html;

# redirect server error pages to the static page /50x.html
#
error_page 500 502 503 504 /50x.html;
location = /50x.html {
root html;
}

# proxy the PHP scripts to Apache listening on 127.0.0.1:80
#
#location ~ \.php$ {
# proxy_pass http://127.0.0.1;
#}

# pass the PHP scripts to FastCGI server listening on 127.0.0.1:9000
#
#location ~ \.php$ {
# root html;
# fastcgi_pass 127.0.0.1:9000;
# fastcgi_index index.php;
# fastcgi_param SCRIPT_FILENAME /scripts$fastcgi_script_name;
# include fastcgi_params;
#}

# deny access to .htaccess files, if Apache's document root
# concurs with nginx's one
#
#location ~ /\.ht {
# deny all;
#}
}


# another virtual host using mix of IP-, name-, and port-based configuration
#
#server {
# listen 8000;
# listen somename:8080;
# server_name somename alias another.alias;

# location / {
# root html;
# index index.html index.htm;
# }
#}


# HTTPS server
#
#server {
# listen 443 ssl;
# server_name localhost;

# ssl_certificate cert.pem;
# ssl_certificate_key cert.key;

# ssl_session_cache shared:SSL:1m;
# ssl_session_timeout 5m;

# ssl_ciphers HIGH:!aNULL:!MD5;
# ssl_prefer_server_ciphers on;

# location / {
# root html;
# index index.html index.htm;
# }
#}
}

2.Nginx虚拟主机配置

1.基于域名配置(使用的比较多)

1) 在nginx/conf/nginx.conf文件中的http段中添加一个server,如下所示:

1
2
3
4
5
6
7
8
9
1     # 基于域名的虚拟主机配置
2 server {
3 listen 80;
4 server_name www.xbq.com;
5 location / {
6 root html/host; # 相对路径,在 nginx/html/host目录中
7 index admin.html;
8 }
9 }

2) 在nginx/html文件夹中新建 host 文件夹,然后在 host文件夹中 新建admin.html文件,admin.html文件中的内容为:

Hello,This is host page,www.xbq.com.

3) 重新加载nginx.conf文件,./nginx -s reload

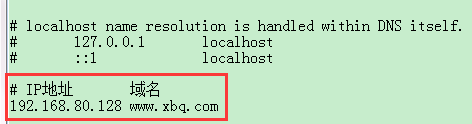
4) 修改C:\Windows\System32\drivers\etc\hosts文件,添加如下内容,为了将域名解析:

img

5) 浏览器访问:www.xbq.com,发现和刚刚写的admin.html内容一样,成功!

img

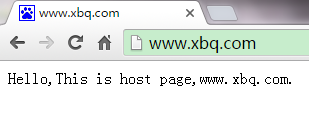
当访问www.xbq.com的时候,会匹配server中 server_name,然后找到html/host文件夹中的admin.html,返回界面。

2.基于端口配置

1) 在nginx/conf/nginx.conf文件中的http段中添加一个server,如下所示:

1
2
3
4
5
6
7
8
9
1     # 基于端口号的虚拟主机配置
2 server {
3 listen 8888;
4 server_name test; # 无实际意义,可省略
5 location / {
6 root html/port; # 相对路径,在nginx/html/port目录中
7 index admin.html;
8 }
9 }

2) 在nginx/html文件夹中新建 port文件夹,然后在 port文件夹中 新建admin.html文件,admin.html文件中的内容为:

Hello,This is port page.

3) 重新加载nginx.conf文件,./nginx -s reload

4) 浏览器访问:http://192.168.80.128:8888/,出现如下,则成功:

img

3.基于IP配置(使用的比较少)

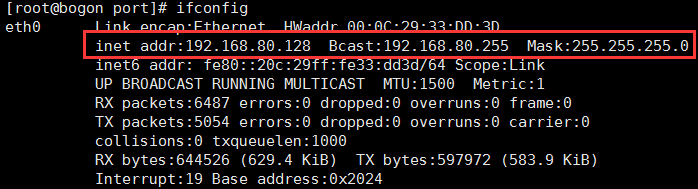
(1) 先查看本机的IP,ifconfig

img

(2) 添加虚拟网卡

ifconfig eth0:1 192.168.80.150 broadcast 192.168.80.255 netmask 255.255.255.0 up

route add -host 192.168.80.150 dev eth0:1

(3) 检测网络是否通:ping 192.169.80.150

img

(4) 在nginx/conf/nginx.conf文件中的http段中添加一个server,如下所示:

1
2
3
4
5
6
7
8
9
1     # 基于IP的虚拟主机配置
2 server {
3 listen 80;
4 server_name 192.168.80.150; # 新建的虚拟网卡,是内网IP,只能通过 wget访问
5 location / {
6 root html/ip;
7 index admin.html;
8 }
9 }

(5) 在nginx/html文件夹中新建 ip文件夹,然后在 ip文件夹中 新建admin.html文件,admin.html文件中的内容为:

Hello,This is IP page.

(6) 重新加载nginx.conf文件,./nginx -s reload

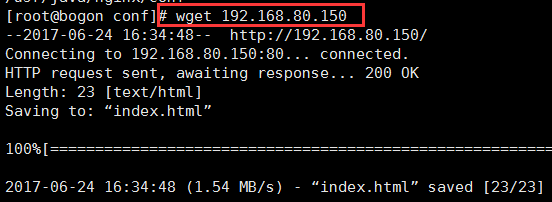
(7) 到nginx/conf 目录下,访问 刚刚的IP地址:wget 192.168.80.150,发现下载成功!

img

坚持原创技术分享,您的支持将鼓励我继续创作!
-------------本文结束感谢您的阅读-------------
分享到:
0%